

In the constantly evolving digital landscape of 2025, data management is more than a necessity; it’s a strategic imperative. Between growing data privacy concerns, the shift to a « cookieless » future, and the complexity of analytical tools, having a robust tracking infrastructure is essential. This is where Google Tag Manager (GTM) comes in.
But what exactly is GTM? Imagine it as a centralized, intelligent dashboard that allows you to deploy and manage all your tracking codes (tags) – be it Google Analytics 4 (GA4), Facebook Pixel, Google Ads conversion codes, or any other third-party script – without directly touching your website’s code every time.
In this detailed article, we will guide you step-by-step through the process of installing Google Tag Manager in 2025, ensuring your data collection strategy is future-ready.
Why GTM is Indispensable in 2025: A Strategic Vision
Integrating Google Tag Manager is no longer just an option, but an absolute necessity for any business concerned with its digital performance. Here’s why:
1.1. The Era of Data Privacy and the « Cookieless Future »
With evolving regulations (GDPR, CCPA, and their local equivalents) and the gradual phasing out of third-party cookies, consent management and ethical data tracking are becoming paramount. GTM, combined with Consent Mode, allows you to better adapt your data collection based on user choices, and to prepare for new tracking methods.
1.2. Centralization and Unification of Tracking
No more multiple tags scattered throughout your site’s code! GTM centralizes all your tracking tags in one place. This simplifies management, reduces errors, and improves your site’s loading speed, a crucial factor for SEO.
1.3. Flexibility and Autonomy for Marketers
GTM gives significant power to marketing teams. You can deploy, test, and modify tags without constant developer intervention, which speeds up the implementation of your strategies and makes you more agile in the face of opportunities or problems.
1.4. Preparation for Google Analytics 4 (GA4) and Future Innovations
GA4 is natively designed for GTM. By adopting it, you ensure a smooth transition to Google’s latest generation of analytics tools and are ready for future innovations in user behavior measurement, especially in a post-cookie world.
2. Prerequisites Before You Start: Prepare the Ground
Before diving into the installation, make sure you have the following:
A Google Account: Essential for accessing Google Tag Manager.
Access to Your Website’s Code: You will need to insert specific code snippets into the
<head>and<body>sections of your site. If you use a CMS (WordPress, Shopify, Wix, etc.), access to the administration dashboard or theme customization options will suffice.A Basic Understanding of HTML: Knowing where the
<head>and<body>tags are located in an HTML document is an asset. Don’t worry, this guide is designed to be simple!
3. Step-by-Step Installation Guide: Get GTM Up and Running
Installing GTM is a simple process that takes less than 10 minutes. Follow these steps carefully:
Step 1: Create a GTM Account and Container
Go to Google Tag Manager: Open your browser and navigate to tagmanager.google.com.
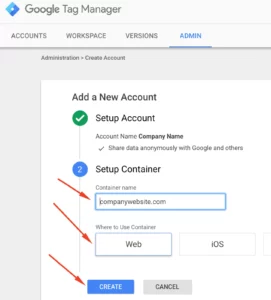
Create an Account:
If this is your first time, click « Create Account ».
Fill in the requested information:
Account Name: Your company or organization name.
Country: Your country.
Uncheck or check the « Share data anonymously with Google and others » box based on your preferences.
Create a Container: A container is where all your tags, triggers, and variables will be stored for a specific website or app.
Container Name: Your website name (e.g.,
MyWebsite.com).Target Platform: Choose
Webfor a classic website. (You also have options for iOS, Android, AMP, and Server, but for a website, it’sWeb).Click « Create ».
Accept the Google Tag Manager Terms of Service.
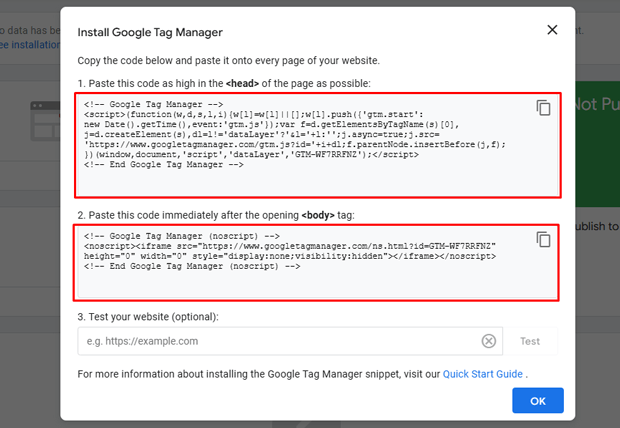
Step 2: Retrieve GTM Code Snippets
Immediately after creating your container, a pop-up window will appear, displaying two code snippets. These are the crucial elements to integrate into your site.
First Snippet (
<head>snippet): To be placed as high as possible in the<head>section of your page.Second Snippet (
<body>snippet): To be placed immediately after the opening<body>tag of your page.
Important: If you accidentally close this window, don’t panic! You can find these snippets at any time by clicking on your GTM container ID (starting with GTM-XXXXXXX) in the top right corner of the GTM interface.
Step 3: Integrate the Code Snippets into Your Website
This is the most technical step, but several methods exist. Choose the one that best suits your configuration:
Method A: Direct HTML Code Integration (For experts or developers)
If you have direct access to your site’s HTML files (or if you work with a developer):
Open the
header.phpfile (for classic WordPress sites) or your site’s header template file (<head>).Copy the first code snippet (HEAD) and paste it immediately after the opening
<head>tag. Make sure it’s as high as possible in this section.Open your site’s body template file (
<body>).Copy the second code snippet (BODY) and paste it immediately after the opening
<body>tag.Save the changes.
N.B.: Replace GTM-XXXXXXX with your own GTM container ID.
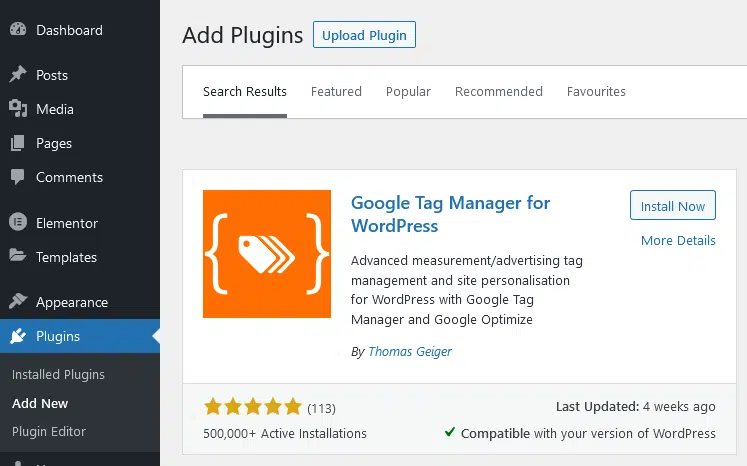
Method B: Via a Content Management System (CMS) - The most common
Most popular CMSs offer simple ways to integrate GTM:
WordPress:
Option 1 (Recommended Plugin): Use a plugin like « Header Footer Code Manager » or « Google Tag Manager for WordPress » (by Thomas Geiger). These plugins allow you to paste your GTM snippets into dedicated fields without touching the theme code.
- Option 2 (Theme Modification): Go to « Appearance > Theme File Editor » and modify your child theme’s
header.phpandbody.phporfooter.phpfiles (recommended to avoid losing changes during theme updates). Paste the snippets as described in Method A. Shopify:
In your Shopify dashboard, go to « Online Store > Themes ».
Click the three dots
...next to the current theme and choose « Edit code ».Find the
theme.liquidfile (or equivalent).Paste the
<head>snippet just after the<head>tag.Paste the
<body>snippet just after the<body>tag.Save.
Wix / Squarespace: These platforms often have dedicated « Custom Code » or « Integrations » sections in their settings. Look for an option to add code to the site’s header or body.
Method C: Via a Theme Customization Option (If your theme allows it)
Some themes (especially on WordPress) include options to insert code into the header or footer directly via the customization interface (Appearance > Customize). This can be safer than editing the files directly.
4. Verify GTM Installation: The Essential Confirmation
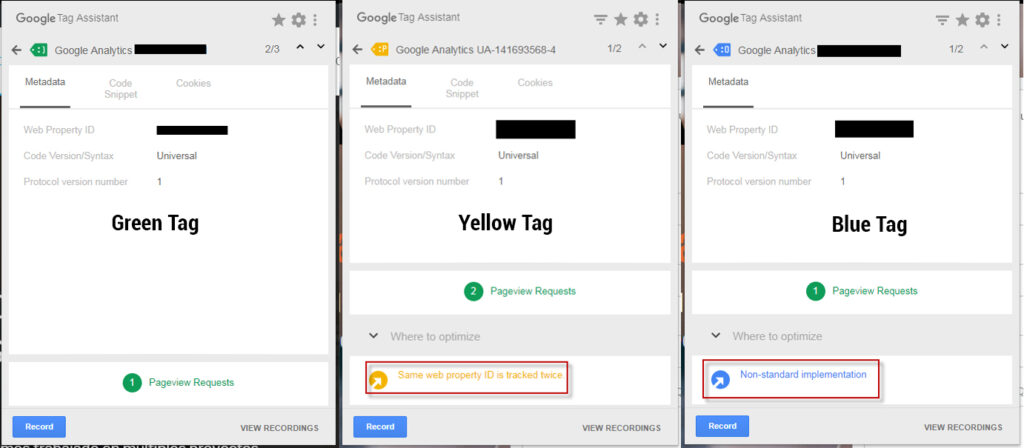
Install the Google Tag Assistant Legacy extension on your Chrome browser.
Go to your website.
Click on the Tag Assistant extension icon (a small blue tag).
Click « Enable » and then refresh the page.
Tag Assistant should display your GTM container (GTM-XXXXXXX) in green, indicating a successful installation.
4.2. Use Google Tag Manager Preview Mode
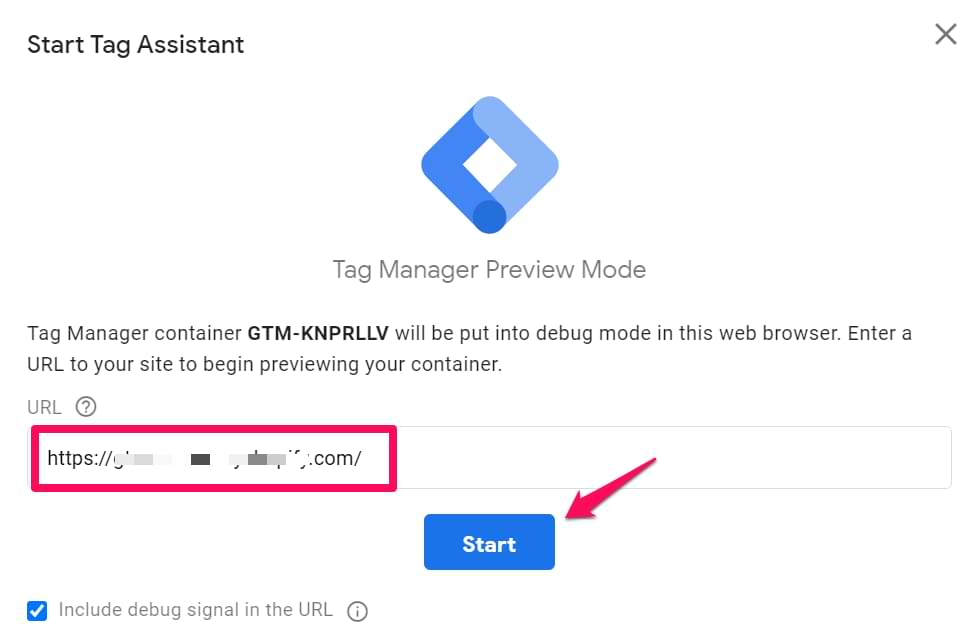
GTM’s Preview mode is the most reliable tool for testing.
In the GTM interface, click the « Preview » button in the top right corner.
A new window or tab will open, asking for your site’s URL. Enter the URL and click « Connect ».
Your site will open in a new tab, and a debugging window (« Tag Assistant Debugger ») will appear at the bottom of the screen.
If everything is correct, the « Tag Assistant Debugger » will display « Connected » and your GTM container ID.
If you don’t see the container or if errors are reported, recheck the exact placement of the code snippets on your site.
5. First Steps After Installation: Add your first GA4 tag
Now that GTM is installed, let’s take advantage of it to add your first tag: the Google Analytics 4 (GA4) configuration tag.
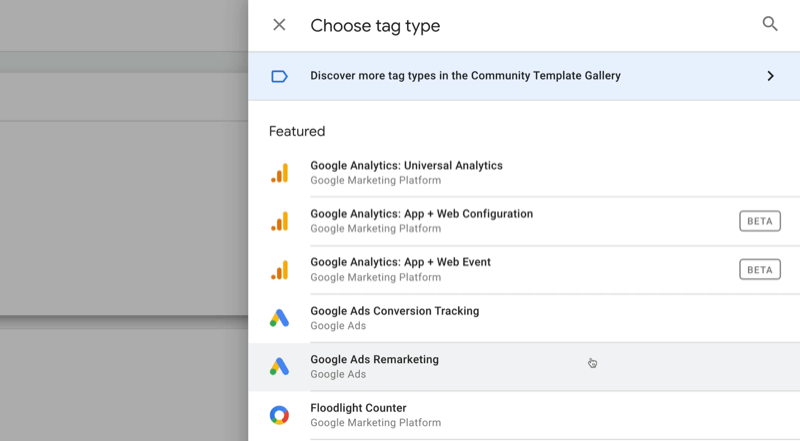
In the GTM interface, click « New Tag ».
Click « Tag Configuration » and choose the « Google Analytics: GA4 Configuration » type.
Enter your GA4 Measurement ID (starting with
G-XXXXXXX). You can find it in your Google Analytics 4 interface under « Admin > Data Streams > your web stream > Measurement ID ».Click « Triggering » and choose « All Pages ». This means the GA4 tag will fire on every page of your site
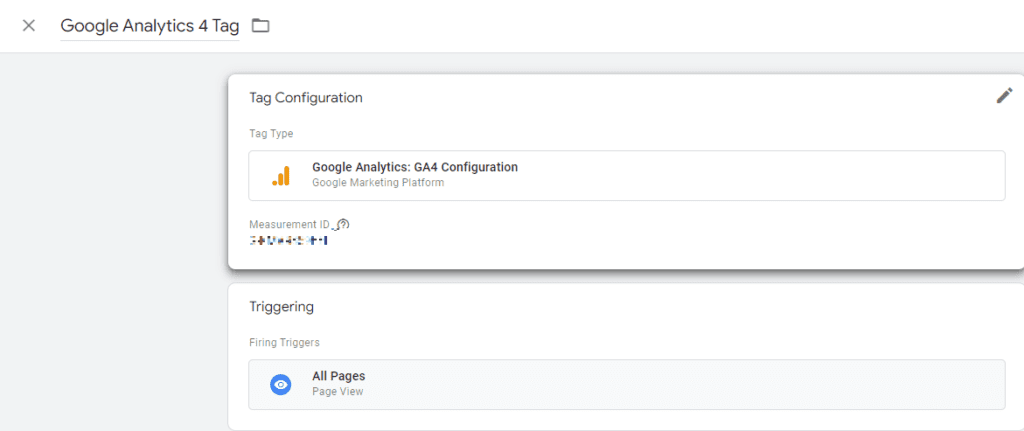
Name your tag (e.g.,
GA4 - Configuration) and « Save ».Click « Submit » in the top right to publish the changes to your site. Never forget to publish!
Congratulations! You have not only installed Google Tag Manager, but you have also successfully deployed your first GA4 tag.
Conclusion: Mastery and Agility for Your Digital Strategy
By installing Google Tag Manager, you have laid an essential cornerstone for a modern and effective digital marketing strategy in 2025. You have gained autonomy and flexibility, and you are armed for the future challenges of data collection, privacy, and performance measurement.
GTM is a powerful tool that will allow you to precisely track user behavior, optimize your campaigns, and make informed, data-driven decisions. Don’t miss the opportunity to master this tool to propel your digital-guidelines.com website and your client projects to new heights.
Ready to go further? Explore our other articles on SEO optimization, strategic content creation, and data analysis to maximize your digital potential.